
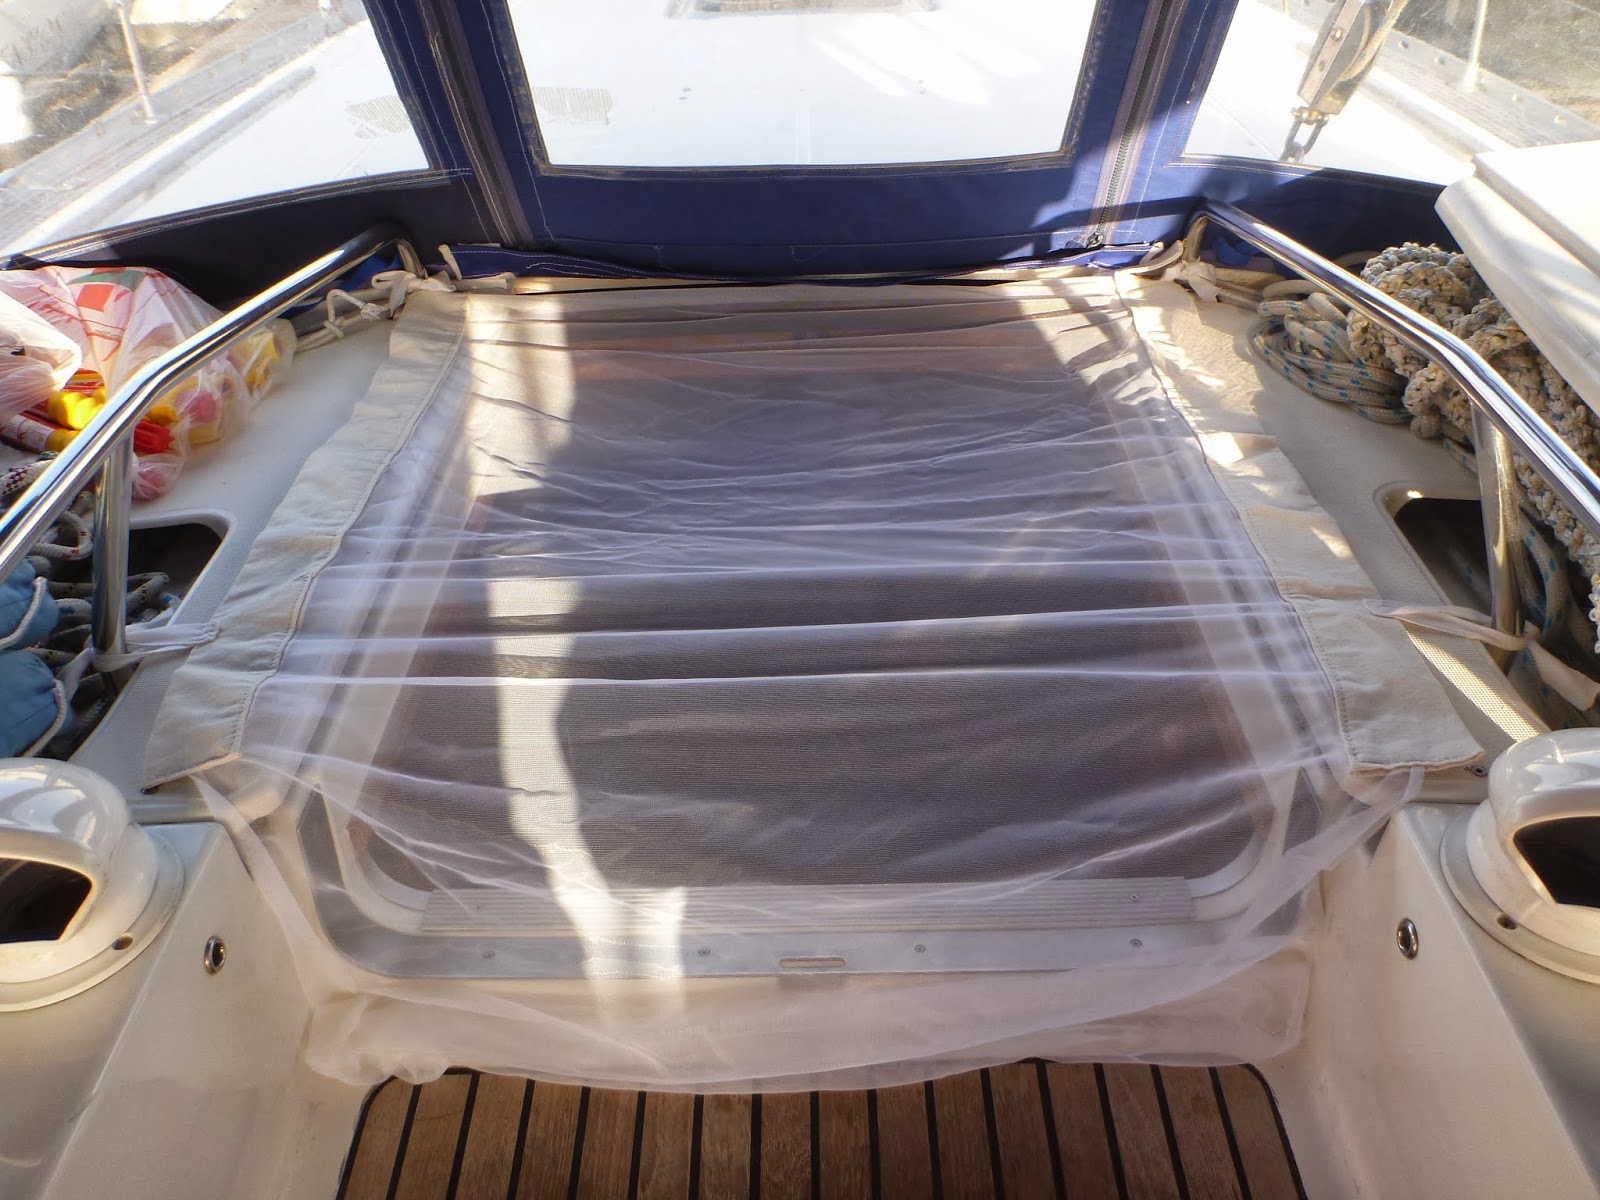
 |
| Under hatch nets – courtesy SY Rampage |
Mosquitos and noseeums love me whereas my body hates them usually producing big weals wherever I’ve been bitten so I am all for keeping them out of the boat as much as possible. With the new sewing machine on board I was very keen as my first major project to make some mossie nets for Temptress but it took a little longer than I’d planned. As it turned out purchasing cheap mosquito netting online last May was the simplest step with me rapidly realising why the things are so expensive to buy. Here is my tale which perhaps will help anyone embarking on a similar project….
 |
| Commercial Mosquito Net for over hatch |
First every hatch on Temptress is a different size, well not quite but almost. There are two pairs of rectangular hatches (one each above the aft cabins and two above the master cabin) that have similar dimensions but the other three are all different. So if you want to make your own mosquito nets carefully measure every hatch a net is required for. Which brings me to the second point – simplify the task by deciding whether it is worth making a net for every hatch. A quick survey of Temptress and our hatch use came up with the following; the port aft cabin is used for storage so the hatch is rarely if ever opened likewise are the ones in the master cabin which often have the dinghy on top of them so by habit the opening portholes in the hull are usually used for ventilation (screens for these was a project in itself). The forepeak hatch is so far forward as to be useless for ventilation unless the windscoop is in place which in turn means no room for a mossie net. Then there is the main hatch into the companionway which has technical difficulties of its own that I’ll come to later. So that left the saloon hatch, the starboard aft guest cabin and the forward heads – so three mosquito nets plus something for the main companionway. Much less work than tackling all seven hatches and the companionway.
Next was the design for the hatches. We’d discounted nets fixed inside (SY Dos Libros has a good blog on making this type) as we already have blinds and also didn’t want ugly velcro stuck around the underside of the teak hatch surrounds. It had to be external popping over the open hatch. I started examining nets other boats were using – RC Louise had some rather snazzy ones with a wide white weighted edging supplied by the builder, Summerwind had chain inserted through the hem of nets that a previous owner had made. The basic design of both was much the same a sort of stubby toblerone shape. So thinking “roof shaped” a design evolved; two triangles (gable ends) sewn onto a rectangle to make a net that slips over the hatch and theoretically permits it to be opened or closed from within the boat without removing the net. I started with the largest of the three hatches, the one over the saloon and measured the height of the open hatch plus the dimensions of the opening. It is almost a square opening so the triangular ends must be at least 60x60x60 cm and the main piece 120x60cm. Add a couple of cm for a comfortable fit and another couple for for seam allowances all round. I simply measured and marked the shapes out with pins – this wasn’t haute couture requiring a perfect fit!
How about weighting the net down? This was the long pause in the project whilst I solved the problem and sourced something reasonably heavy. Curtain weight seemed ideal as it is heavy and comes in a continuous strand so could be threaded through a hem but wasn’t available in Morocco where I first started this project. Or at least my limited French couldn’t describe what was required in a couple of fabric shops. What else? My initial plan was to hem the netting over whatever was to be used for holding it down but on sewing the long side of rectangle to two sides of one of the triangles I discovered that mossie net is extremely slippery and has no structure to cope with the pressure of the sewing machine. It quickly vanishes down inside the feed and becomes a mess. When dressmaking with fine material I knew that layering tissue paper either side of the fabric when stitching the seam avoids marking delicate fabrics and provides some support. I tried it with the net but it wasn’t that neat a job as once removed the stitching was quite loose due to the holes in the net. OK but not perfect so the remaining net only seams were sewn by hand as it was just as quick as fighting with four slippery layers of fabric and tissue.
 |
| The foreward heads – mossie net in place |
So how to attach whatever was going to keep the net in place? I decided a second fabric was needed. For the Mark I version I tried a strip of spinnaker material as a 1.5cm wide binding (I should have made it wider than this) then threaded it with elastic but the lip on the hatch is not very high and the elastic simply rose up and slid off in the slightest breeze, string to tie it down wasn’t going to be much better without some thing to tie it onto on the deck which was too difficult. So onto Mark II. Whilst walking the souks of Rabat with Kevin looking for U-bolts (for his jerry can/plank project) I found some sink plug chain sold by the metre to replace the elastic with the aim of weighing the hem down but it too wasn’t up to the strong Moroccan sea breeze. Mark III – hunting around the forepeak I found a length of 14mm rope too short to do anything useful on the boat so as an experiment I wrapped the spinnaker hem around it and hand stitched over the whole to hold it together. Success!
Into production went this design for the two remaining hatches with a minor modification of a wider 6cm hem made of cream canvas so I could stitch the rope into the hem as the hem was attached to the base of the net – a bit like doing cushion piping on a massive scale! The only improvement I would suggest is that the resulting nets are a bit snug so closing the hatches tightly from the inside is impossible as the net gets caught up, the dimensions could be 5 or 6cm larger in every direction for easier use but in some places Temptress’ hatches are set down into the deck (a consequence of having a false deck under which all the lines are lead aft from the mast) making it difficult to fit anything too bulky.
 |
| Typical companionway net – courtesy Distant Shores |
Next the companionway. After a lot of internet research I discovered not one net pictured for a similar companionway to our own. Temptress has a large top fore-aft opening but a very small washboard height as she has a comfortable bridge deck on which to perch whilst on watch. My favourite seat! As the washboard is only some 15 or 20 cm high we usually leave the full hatch open in order to create some airflow into the saloon below. Many boats with a far larger washboard space slide their hatch shut and the netting is suspended from it to the deck in the space where the washboards fit. How to suspend slippery net over a horizontal opening without the dreaded velcro? A further complication is that Temptress has granny bars either side of the companionway opening as well as a two dorade vents so there is little surface for a net to cling onto. Eventually I realised I could use some of the uprights on the granny bars to my advantage as posts to tie the net to.
I measured, I drew, I measured, I cut bits of paper as a pattern and after pondering on the subject for several weeks decided I had a design that might work. Mosquitoes are cunning little things and can get through the slightest of spaces so it was important there were absolutely no gaps. So with a length of net longer than the fore aft size of the opening plus a couple of times the washboard height and slightly wider than the width of the companionway and including a couple of cm extra all round for seam allowances ( ie 73x125cm) I started construction.
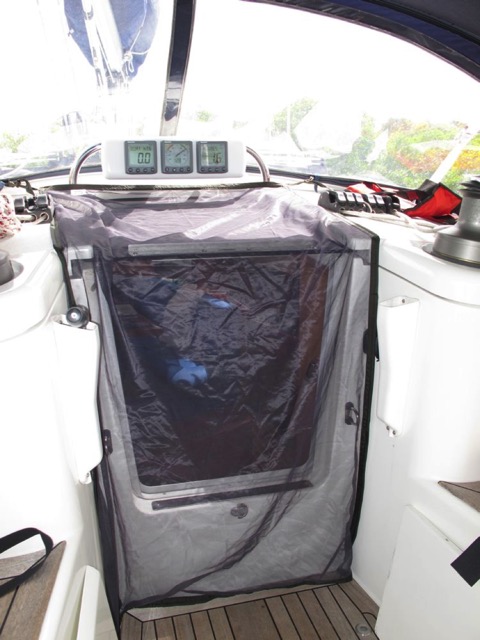
 |
| Companionway net in place – you can even have the hatch closed if needed |
Two wide pieces of folded canvas became the side supports. A third thinner piece sewn across the forward end acts as a tab to hold the net in place across and behind the raised edge of the open hatch. Stitching canvas and net posed no problem for the sewing machine which made things less frustrating. Then I hand sewed lengths of cotton tape onto the upper side of the canvas supports to be tied to the granny bars. Once tied on the knots can be pushed down so the canvas is in contact with the bobbly non-slip surface of the deck – hopefully this will be mossie proof, if not then I can add some fluffy loopy velcro to the underside of the canvas hopefully filling fill any gaps. The canvas sides are about 5 or 8 cm down from the cross hatch tab so there is plenty of net to fill any gaps between the hatch itself and the slightly higher deck. At the other end I left over 30 cm of net hanging down and rolled the very end of it over a couple of lengths of plug chain before hand stitching the hem and chain in place. This loose part fills the washboard gap as well as ensuring the sides of the washboard area have no mossie sized spaces.
 |
| Rolled up and tucked away behind the lip/handle of the perspex hatch |
I thought about some additional fastenings in the form of elastic loops over the dorade vents but decided if it was too well fastened getting in and out would be onerous. So simple reef knots to tie it onto the middle granny bar uprights, one on either side a task which can be done easily from inside or from the cockpit. The forward end of the net can remain in place even when the net is not in use as it all rolls neatly onto the top of the hatch. Result!
